05/28/2021
Auth0 with Spring Boot and Angular
In this article I want to guide you through the steps to secure a Spring Boot REST API and an Angular SPA using Auth0. In a lot of tutorials and articles I everytime only came up integrating Auth0 either on the API-side or on the client-side. A complete example I was always missing. In the past I struggled with putting things together. Finally I managed it and now want to share this knowledge
In this article I will use Spring Boot 2.4.5 and Angular 11.
Create a Auth0-tenant
You can simply follow the official guide. Just name your tenant e.g. test-tenant. We will need it later.
The backend
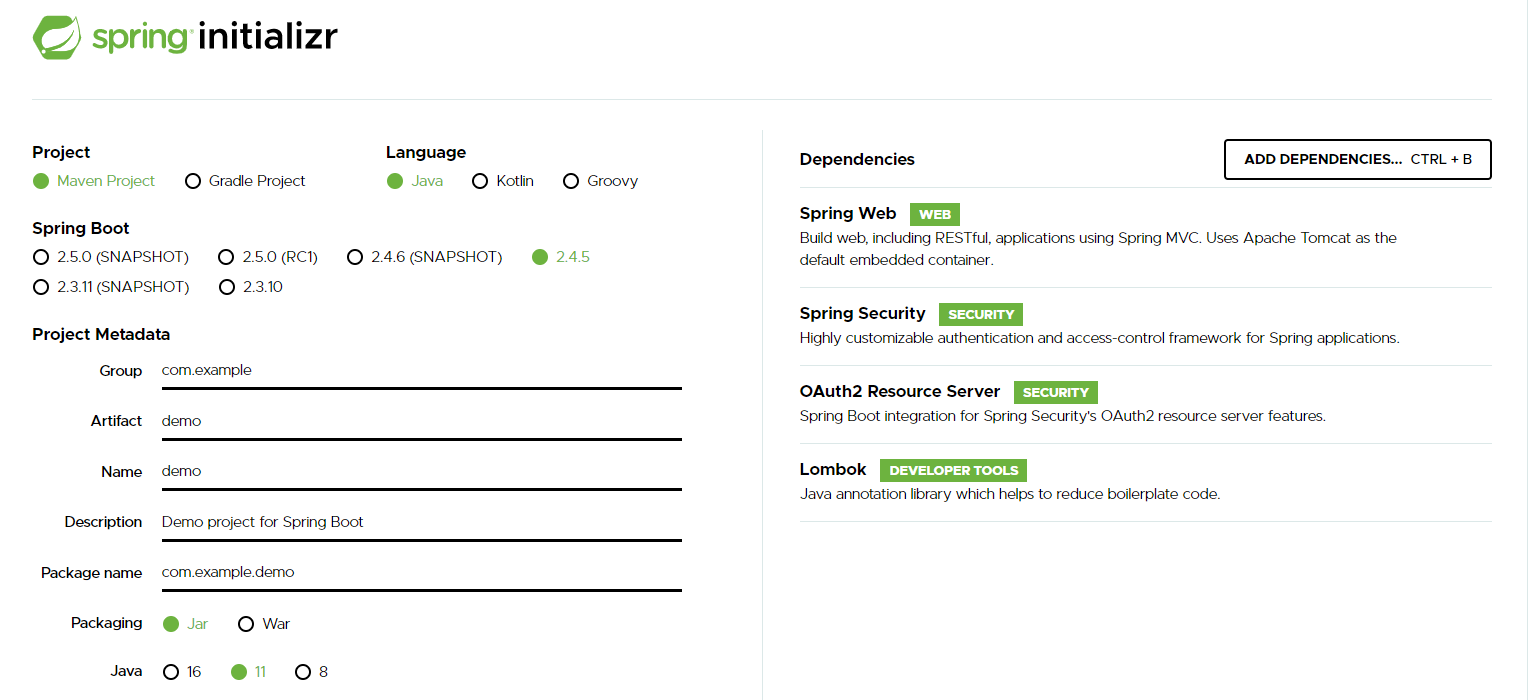
We’ll create a very simple Spring Boot application, exposing some static data via REST-API. You can use spring initializr to create an application. It is important to select spring-starter-web, spring-starter-security and spring-security-oauth2-resource-server dependencies. For convenience reasons I did also include lombok:
The API
For the sake of simplicity we’ll follow the official Auth0-guide for securing a REST-API.
Let’s create simple Controller:
public class APIController {

    @GetMapping(value = "/public")
    public Message publicEndpoint() {
        return new Message("All good. You DO NOT need to be authenticated to call /api/public.");
    }

    @GetMapping(value = "/private")
    public Message privateEndpoint() {
        return new Message("All good. You can see this because you are Authenticated.");
    }

    @GetMapping(value = "/private-scoped")
    public Message privateScopedEndpoint() {
        return new Message("All good. You can see this because you are Authenticated with a Token granted the 'admin' scope");
    }
}
and a simple Message class:
@RequiredArgsConstructor
public class Message {
    private final String message;
}
Auth0-API configuration
Now let’s come to the important part for securing the API.
In the Auth0-dashboard go to Applications > API and create a new API:
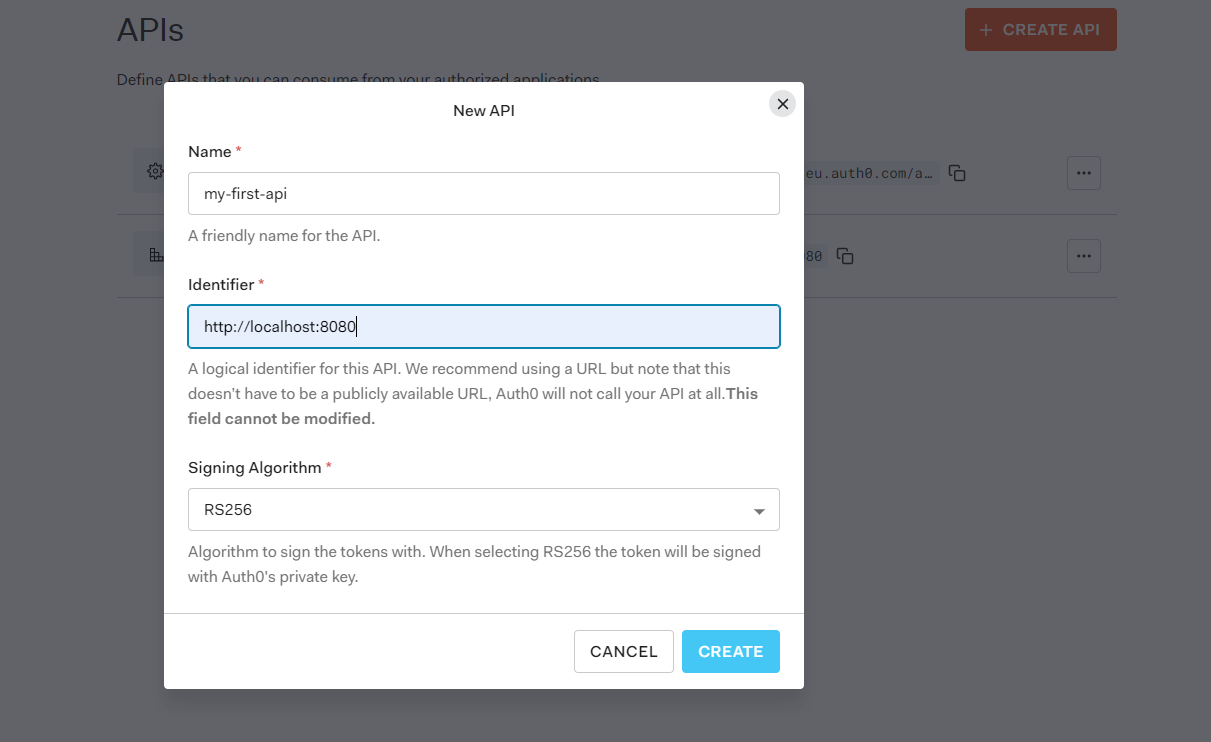
Once the API is created, go to the permissions tab and create a new permission called admin. In OAuth-terminology a permission is also called a scope.
That’s it for now to setup the API in Auth0.
Wire Auth0-API config together with our backend
To use now Auth0 as Authorization server in our Spring Boot application, we will at first enhance the application.yml as following:
auth0:
  # Replace with the audience/identifier you configured
  audience: http://localhost:8080

# The following is standard Spring Security OAuth2 configuration.
spring:
  security:
    oauth2:
      resourceserver:
        jwt:
          # Replace with the domain of your Auth0 tenant.
          # Note the trailing slash is important!
          issuer-uri: https://<YOUR_AUTH0_DOMAIN>.auth0.com/
The important part is to define the issuer-uri. It defines the issuer of the id- and access-token.
The next step is to create a SecurityConfig:
@EnableWebSecurity
public class SecurityConfig extends WebSecurityConfigurerAdapter {

    @Value( "${auth0.audience}" )
    private String audience;

    @Value("${spring.security.oauth2.resourceserver.jwt.issuer-uri}")
    private String issuer;

    @Override
    public void configure(HttpSecurity http) throws Exception {
        /*
        This is where we configure the security required for our endpoints and setup our app to serve as
        an OAuth2 Resource Server, using JWT validation.
        */
        http.authorizeRequests()
                .mvcMatchers("/api/public").permitAll()
                .mvcMatchers("/api/private").authenticated()
                // secure api with admin-scope
                .mvcMatchers("/api/private-scoped").hasAuthority("SCOPE_admin")
                .and().cors()
                .and().oauth2ResourceServer().jwt();
    }

    @Bean
    JwtDecoder jwtDecoder() {
        /*
        By default, Spring Security does not validate the "aud" claim of the token, to ensure that this token is
        indeed intended for our app. Adding our own validator is easy to do:
        */

        NimbusJwtDecoder jwtDecoder = (NimbusJwtDecoder)
                JwtDecoders.fromOidcIssuerLocation(issuer);

        OAuth2TokenValidator<Jwt> audienceValidator = new AudienceValidator(audience);
        OAuth2TokenValidator<Jwt> withIssuer = JwtValidators.createDefaultWithIssuer(issuer);
        OAuth2TokenValidator<Jwt> withAudience = new DelegatingOAuth2TokenValidator<>(withIssuer, audienceValidator);

        jwtDecoder.setJwtValidator(withAudience);

        return jwtDecoder;
    }
}
and AudienceValidator:
class AudienceValidator implements OAuth2TokenValidator<Jwt> {
    private final String audience;

    AudienceValidator(String audience) {
        this.audience = audience;
    }

    public OAuth2TokenValidatorResult validate(Jwt jwt) {
        OAuth2Error error = new OAuth2Error("invalid_token", "The required audience is missing", null);

        if (jwt.getAudience().contains(audience)) {
            return OAuth2TokenValidatorResult.success();
        }

        return OAuth2TokenValidatorResult.failure(error);
    }
}
Now everything is in place that our API is secured. Let’s go on with the frontend.
The frontend
We will create a very simple Angular application to demonstrate how to login and retrieve an access token for our API. After retrieving a token we will then call the different endpoints to demonstrate the security mechanism.
Frontend creation
First create a new application using the Angular-CLI ng new api-client. After creating the application we will install angular-oauth2-oidc. This is a well established library to integrate OAuth and OIDC in an Angular application.
We install the dependency as described in the docs: npm i angular-oauth2-oidc --save. We’ll use this library to setup the authentication-mechanism.
As mentioned we will create a very simple frontend. The app.component will look like this:
interface Message {
  message: string;
}

@Component({
  selector: "app-root",
  template: `
    <button (click)="login()">login</button>
    <button (click)="request()">API call</button>

    <br />
    {{ public$ | async | json }}
    <br />
    {{ private$ | async | json }}
    <br />
    {{ privateScoped$ | async | json }}
  `,
  styleUrls: ["./app.component.scss"],
})
export class AppComponent {
  public$: Observable<Message>;
  private$: Observable<Message>;
  privateScoped$: Observable<Message>;

  constructor(private auth: AuthService, private http: HttpClient) {}

  login(): void {
    this.auth.login();
  }

  request(): void {
    this.public$ = this.http.get<Message>("http://localhost:3010/api/public");
    this.private$ = this.http.get<Message>("http://localhost:3010/api/private");
    this.privateScoped$ = this.http.get<Message>(
      "http://localhost:3010/api/private-scoped"
    );
  }
}
Note the three observables public$, private$ and privateScoped$. These observables will be used to display the messages from our API.
The login-method will redirect the user to a login page where e.g. a sign-in with Google is possible. That’s it for the AppComponent. After setting up the frontend in Auth0, we will come back and have a look on how the AuthService is implemented.
Configure the frontend in Auth0
In the Auth0-dashboard go to Applications > Applications and create a new application:
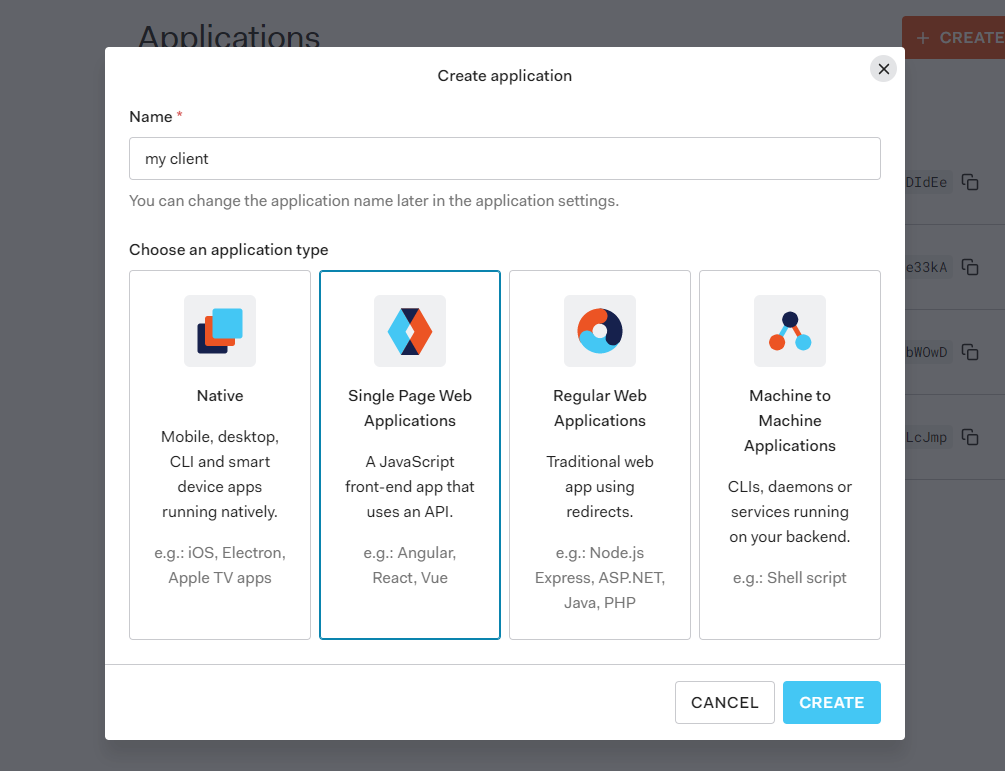
Name the application as you like. Important is that you select Single Page Web Applications as application type.
In the next screen you’ll need to go to settings. Change the application type to Single Page Application under Application Properties. After that move on to Application URIs. There specify the Allowed Callback URLs as http://localhost:4200, so the URL our frontend is running on locally. That’s it for configuring the client in Auth0.
Implement the AuthService
Finally let’s implement the AuthService to authenticate our users:
export const authCodeFlowConfig: AuthConfig = {
  // URL of identity provider. https://<YOUR_DOMAIN>.auth0.com
  issuer: 'https://test-tenant.eu.auth0.com/',
  redirectUri: window.location.origin,
  clientId: <REPLACE_WITH_YOUR_CLIENT_ID>,
  responseType: 'code',
  scope: 'openid profile admin',
  showDebugInformation: true,
  silentRefreshRedirectUri: window.location.origin,
  useSilentRefresh: true,
  customQueryParams: {
    /**
     * replace with your API-Audience
     * This is very important to retrieve a valid access_token for our API
     * */
    audience: 'http://localhost:8080',
  },
};

@Injectable({
  providedIn: 'root'
})
export class AuthService {

  constructor(private oauth: OAuthService) {
    this.oauth.configure(authCodeFlowConfig);
    this.oauth.loadDiscoveryDocumentAndTryLogin();
    this.oauth.setupAutomaticSilentRefresh();
  }

  login(): void {
    this.oauth.initLoginFlow();
  }
}
That’s all. angular-oauth2-oidc does all the heavy lifting in the background. How everything works together is explained well in the official docs. I only want to go over the important configuration properties in authCodeFlowConfig which are needed:
issuer: This is the URL of the idendtity provider. Auth0 follows the conventionhttps://<REPLACE_WITH_YOUR_AUTH0_TENANT>.eu.auth0.com/which will result inhttps://test-tenant.eu.auth0.com/for this example as we named our tenanttest-tenantin the first step.redirectUri: Can be any valid URL in the FE. Important is that it must be registered as Allowed Callback URL in the Application URIs when defining the application in Auth0.clientId: Here you need to provide the id of my-client we defined earlier in Auth0-application dashboard. This will be used to identify the applicationresponseType: Current best practice iscodewhich uses Code authentication flow with PKCE. By default when you create a SPA in Auth0 this flow is enabled together with the implicit flow. You can change this under Applications > Applications > my-client > Settings > Advanced Settings > Grant Types: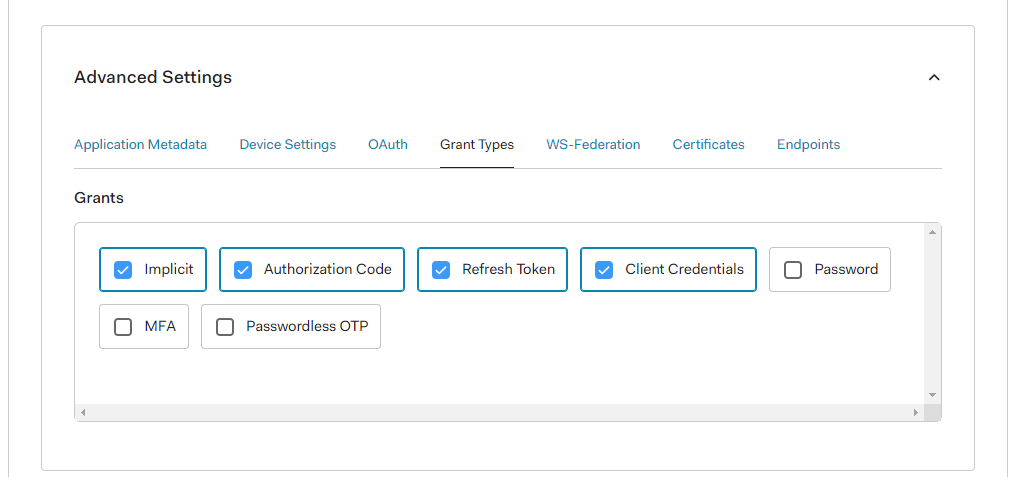 Current Best practice (May 2021) is code authentication with PKCE.
scope: here you define what scope (permission) should be requested.customQueryParams: This is the last important thing. Here we finally define which API we want to consume and authenticate against with our SPA. It is important to provideaudienceand the audience-id when we set up the backend.
See everything together in action
 Clicking on the login-button will redirect to a default Auth0-login screen. As you can see all three messages from the three endpoints are resolved because we are successfully authenticated with the admin scope.
If you remove the admin scope from the authCodeFlowConfig and login again you will not see the last message, as we have not requested the permission to call the private-scoped-endpoint.
